I am taking a study of drawing lifelike portraits from photographs. I am trying to make Tuesday's my lesson planning day for teaching.
How to Draw Lifelike Portraits from Photographs
By Lee Hammond
Five Elements of Shading
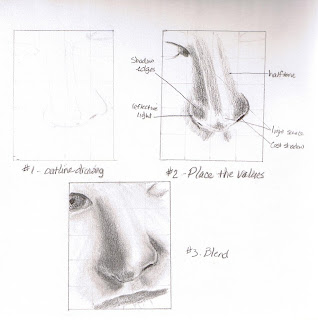
Cast Shadow – darkest dark, as close to black as possible. This is the shadow the object creates from being away from the light source.
Shadow Edge – This is not the edge of the object. (The edge is the reflected light.) It is where the object is receding from the light, and is on the opposite side of the light soure.
Halftone – This is medium gray, the true color of the object. It is neither light nor dark so that is why it is called halftone.
Reflected Light – This is the edge of the object, between the cast shadow and shadow edge. Reflected light is never white. It is closer to halftone in value. The value is between white and halftone.
Full Light – This is where the light falls directly on the object. The paper will remain white.

The Nose
The nose is similar to the sphere in its roundness and how it reflects light. Blending is the key element to drawing.
First locate the light source. On every nose, the darkest area (cast shadow) is inside the nostril. Any surface that has a “lip” or rim will reflect light.
Blending – Never use hard lines to draw the shape of the nose. Anything with an outline will look flat. Blend from dark to light. Pull any highlight areas out with a kneaded eraser, rather than drawing around them.
Graph the Nose – Make a graph to place over your photo reference. Lightly make another graph onto your drawing paper. Draw a line drawing of the nose with accuracy. Place all tones to the shapes within the nose. Use the 5 elements of shading for this process. Blend the tones from dark to light, following the contour of the nose’s shapes.
Nose Measurements - The nose distance is from the bridge to underneath the nostrils. The distance is equal from the bottom of the chin up to the nostrils. The base of the nose gives a reference point as to where to place the bottom of the earlobes when measuring straight across the face. The space between the eyes is equal to one eye width. This width also gives the width of the nostril area.

No comments:
Post a Comment