Friday, August 20, 2010

The Artist’s Way – FANtastic Friday

Artist Way Image 

Over the last 7 or 8 years, I have been an avid reader to The Artist's Way written by Julia Cameron.  Her writing has given me much insight to who I am as an artist and a person.

The Artist’s Way has been an inspiration.  Julia Cameron’s books have awakened the creative in me so much that I have given many of these books away to my art students.   They report back to me that the book often encourages them when they are in an artistic slump. 

I will be highlighting  The Artist's Way in a series of posts beginning next week.  These posts will be labeled as Thoughtful Thursdays.  I hope you will find true inspiration in the weeks to come!

Monday, August 16, 2010

The Drawing Board – Skin Tones

This time on The Drawing Board we are focusing on the skin tones on the face.

Step 1 - Moving up on the forehead, the area under the hat and underneath the hair are darker than the rest of the skin tones on the face.  They are in the shadow. I shaded these in using a B pencil.

Shading Step 1

I’ve filled in some of the other shadow areas on the face with the same pencil.  He’s starting to take shape, eh?

Step 2 – Blend, blend, and blend some more to get the skin smooth.  I use the kneaded eraser to pull out the highlight on the right facing cheek.

Face BlendingStep 2

aah….He’s a cutie…

Next on The Drawing Board are his ears.

Friday, August 13, 2010

Artful Cookies – FANtastic Friday

I am a huge fan of decorated cookies.  I’ve tried to decorate them myself…in another lifetime.  I thought I had some pictures to show you but I can’t find them. 

IMG_4517 

Anyway, I have a new found friend who decorates beautiful cookies!  Her name is Anne Kehn.  Her work can be seen on her blog, The Artist in the Kitchen.  Not only is she a cookie decorator, she loves to create things with paint too.  She’s a wonderful artist with a lot of creative talent.

Anne is a wonderful person, inside and out.  She was kind and made cookies for my daughter’s birthday this year.  In the past year, she has gotten married and moved from the Philippines to the United States.  I hope you’ll take the time to visit her blog and get acquainted!

Monday, August 9, 2010

The Drawing Board – Mouth and Eyebrows

The Mouth -

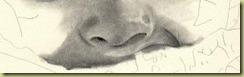
Again, I start in the darkest area of the mouth.  I used a 2B pencil for this example.  I had to pay close attention to what area of the lip the shadow was resting on.  Don’t always assume you know where that shadow is.  It can trick you sometimes.
Mouth The Eyebrows -

Step 1 – The skin tones underneath the eyebrows must be put in.  You can either put them in now or blend them in later.  I chose to put them in now.  I used a heavily soiled blending stump for the skin tones.  If you have a new blender with little or no graphite build-up, you can fill in the area with a pencil that matches the skin tones in your photo. 
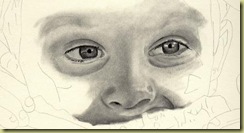
Mouth and Eyebrow Step 1

I lost my outline after putting in the skin tones, so I took the black outline I did on clear acetate to find my place again.

Outline Drawing

Step 2 – Now that I have found my place again, I draw the eyebrow hairs in the direction they are growing.  It is very important to do this.  I used a B pencil that was very sharp to do this.

Eyebrows Step 2

Step 3 – After I draw in the eyebrows, I blend again.  I use a fairly clean blending stump to do this.  I also use a gentle pressure while blending.  I use the kneaded eraser to pull out any highlight areas in the hair.

Eyebrows Kneaded Eraser Steps 3 and 4

Step 4 – We are going to retract a little bit back to the eyes.  Actually, to the eyebrow bone.  Take note that as the brow bone comes up from the eye, it sticks out a little.  The light is going to hit this area.  Make sure to keep it light.  The lower part of the eyebrow will be darker as it curves down toward the eyelid.  Again, most photos flatten this feature.  Draw it in anyway.

Umm…now that I’ve drawn in a lot of the skin tones, I’m noticing the eyes will need to be made darker.  I’ll do that later on in the drawing. 

Skin tones are next on The Drawing Board.

Friday, August 6, 2010

Carolyn Loutzenhiser Watercolor Exhibit


I took myself on an artist's date.  I haven’t had much time to myself this summer, so now was the perfect time.  It had just rained and the temperature outside wasn’t hot and steamy.

Woolaroc has a watercolor exhibit done by Carolyn Loutzenhiser.  The exhibit runs from August 1st through part of September.  Carolyn is a member of the National Watercolor Society.  Her work will take your breath away.  The exhibit is cool and refreshing on a hot summer day.  The vibrant whites literally pull you into the painting.  It’s like drinking a cold glass of water.  You will see Koi, flowers, birds, old buildings, and wildlife in her paintings.

Take a camera with you.  While on your drive through Woolaroc, you might be amongst the buffalo roaming in the pastures and on the road.  You don’t want to miss this great photo opportunity.

Woolaroc is open Wednesday – Sunday, 10:00 am – 5:00 pm.  Tickets are $8 for adults, $6 for those over 65.  Children 11 and under are free.

Wednesday, August 4, 2010

Hot Butter Sauce

028a

Maybe it’s because the weather is so hot that people’s brains are fried.

Maybe it’s because I washed my windows and a precious hummingbird was killed.

Maybe it’s because I had trouble in 3 of the 5 stores I went into.   All I wanted to do was get home and eat my snack of pretzels dipped in cream cheese.   That’s all I wanted, really.  Two of the stores rang up my purchase for more than the original cost.  So, I had to wait e-x-t-r-a time for a refund.  All the while, my foot is tapping, waiting for that snack of cream cheese and pretzels.  The store I went into to buy the pretzels had an upset employee.  Then, they didn’t have the creamy pretzels I wanted.  I had to settle for the extra salty ones.  Finally, I get home for my snack of cream cheese and pretzels.  I get the snack ready and take time to let the cat in from the heat.  While letting her in, my snack of cream cheese and pretzels lands face first onto the floor!  That was the deal breaker.  I had kept my cool until then.  I re-fix my plate of cream cheese and pretzels while the dog snarfs down some of the pretzels that fell on the floor.  I settle down in my comfy chair to eat my long-awaited snack.  Then the ultimate happens…the dog (who had eaten too fast) barfs on the floor in front of me.  I almost barfed right then and there.  I cleaned up the yucky mess and finished my extra salty snack of cream cheese and pretzels.

Or maybe it’s because I have an addiction to real butter that I’m going to share a recipe with you today.  This is really good on crepes, waffles, pancakes, or whatever you like syrup on.


Hot Butter Sauce

½ cup butter

1 cup sugar

½ cup cream

Mix together in large saucepan.  Cook on medium heat until thickened.  (It takes about 30 minutes to get the thick consistency.  If you want it thinner, cook it for a lesser amount of time.)

Sunday, August 1, 2010

The Drawing Board – Noses

Step 1 - I start the nose in the darkest area – the nostril.  I used an 8B pencil with gentle pressure for this.

Nostril

Step 1

Then with a B pencil, I fill in the rest of the nostril and the darker skin tones.

First Blend Step 2

Step 2 – Blend all areas of the nose.

Kneaded Eraser Step 3

Step 3 – After blending, I start fine tuning using a kneaded eraser.  I use the kneaded eraser to pull out the highlights.

The area right above the nostril has reflected light.  Remember to put areas of reflected light in your drawing even if the photo doesn’t show it.  I have found that cameras flatten a subject.  A good rule to remember…know your subject matter well if you want to create realistic drawings.

I usually do the mouth next.  This picture shows very little of the mouth.  I’ll finish it and move to the eyebrows next time on The Drawing Board.