Friday, August 6, 2010

Carolyn Loutzenhiser Watercolor Exhibit


I took myself on an artist's date.  I haven’t had much time to myself this summer, so now was the perfect time.  It had just rained and the temperature outside wasn’t hot and steamy.

Woolaroc has a watercolor exhibit done by Carolyn Loutzenhiser.  The exhibit runs from August 1st through part of September.  Carolyn is a member of the National Watercolor Society.  Her work will take your breath away.  The exhibit is cool and refreshing on a hot summer day.  The vibrant whites literally pull you into the painting.  It’s like drinking a cold glass of water.  You will see Koi, flowers, birds, old buildings, and wildlife in her paintings.

Take a camera with you.  While on your drive through Woolaroc, you might be amongst the buffalo roaming in the pastures and on the road.  You don’t want to miss this great photo opportunity.

Woolaroc is open Wednesday – Sunday, 10:00 am – 5:00 pm.  Tickets are $8 for adults, $6 for those over 65.  Children 11 and under are free.

Wednesday, August 4, 2010

Hot Butter Sauce

028a

Maybe it’s because the weather is so hot that people’s brains are fried.

Maybe it’s because I washed my windows and a precious hummingbird was killed.

Maybe it’s because I had trouble in 3 of the 5 stores I went into.   All I wanted to do was get home and eat my snack of pretzels dipped in cream cheese.   That’s all I wanted, really.  Two of the stores rang up my purchase for more than the original cost.  So, I had to wait e-x-t-r-a time for a refund.  All the while, my foot is tapping, waiting for that snack of cream cheese and pretzels.  The store I went into to buy the pretzels had an upset employee.  Then, they didn’t have the creamy pretzels I wanted.  I had to settle for the extra salty ones.  Finally, I get home for my snack of cream cheese and pretzels.  I get the snack ready and take time to let the cat in from the heat.  While letting her in, my snack of cream cheese and pretzels lands face first onto the floor!  That was the deal breaker.  I had kept my cool until then.  I re-fix my plate of cream cheese and pretzels while the dog snarfs down some of the pretzels that fell on the floor.  I settle down in my comfy chair to eat my long-awaited snack.  Then the ultimate happens…the dog (who had eaten too fast) barfs on the floor in front of me.  I almost barfed right then and there.  I cleaned up the yucky mess and finished my extra salty snack of cream cheese and pretzels.

Or maybe it’s because I have an addiction to real butter that I’m going to share a recipe with you today.  This is really good on crepes, waffles, pancakes, or whatever you like syrup on.


Hot Butter Sauce

½ cup butter

1 cup sugar

½ cup cream

Mix together in large saucepan.  Cook on medium heat until thickened.  (It takes about 30 minutes to get the thick consistency.  If you want it thinner, cook it for a lesser amount of time.)

Sunday, August 1, 2010

The Drawing Board – Noses

Step 1 - I start the nose in the darkest area – the nostril.  I used an 8B pencil with gentle pressure for this.

Nostril

Step 1

Then with a B pencil, I fill in the rest of the nostril and the darker skin tones.

First Blend Step 2

Step 2 – Blend all areas of the nose.

Kneaded Eraser Step 3

Step 3 – After blending, I start fine tuning using a kneaded eraser.  I use the kneaded eraser to pull out the highlights.

The area right above the nostril has reflected light.  Remember to put areas of reflected light in your drawing even if the photo doesn’t show it.  I have found that cameras flatten a subject.  A good rule to remember…know your subject matter well if you want to create realistic drawings.

I usually do the mouth next.  This picture shows very little of the mouth.  I’ll finish it and move to the eyebrows next time on The Drawing Board.


Friday, July 30, 2010

Newly Sharpened Pencils

If you were to walk into my house right now, the smell that would greet you is newly sharpened colored pencils!

Newly Sharpened Pencils Yes…oh, did I mention that the colors match those of the tablecloth? 

I have an upcoming colored pencil workshop August 7th & 8th.  We are making Christmas cards.  I am looking forward to two days of nothing other than art.

As a service to the participants, I order the pencils.  We can get better pricing this way.  So, I decided to save a little class time and sharpen these beauties.  They are ready….are you?

I have a few spots still available if you want to join us.  Email me at valmj2u@yahoo.com if you are interested.

Have a happy day!

Monday, July 19, 2010

Drawing Eyes – Step-by-Step

I get a little carried away with details sometimes, but this is how I teach my students.


Step 1 – Pupil. I always start my portrait with the pupil of the eye. This is the darkest part of the face.


For an eye that is looking straight at you, the iris is perfectly round. A great tool to aid in getting the pupil and iris round is a drill gauge found in a drill set.
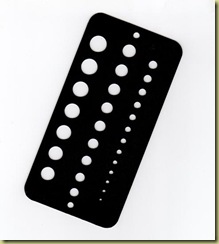


Drill Gauge


Using a very sharp 8B or Ebony pencil, lightly fill in the pupil area. I choose not to press heavy for this because the graphite will create a sheen with heavy pressure. So, a couple of light layers of graphite do the trick. This little guy has a highlight on the right side of the pupil, so it will be odd shaped.
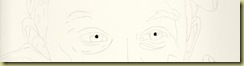


Eyes Step 1


Step 1


Step 2 - Iris. Iris have dark rims around them, so I start with that area. For this guy I used a 4B pencil. I don’t make a complete circle. I use the parenthesis ( ) technique. The eyelids finish off the iris at the end.


Highlights – Make the highlight larger than it really is. You can always make them smaller later. Once they are too small, it is difficult to make them large again.
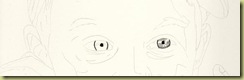


Eyes Step 2


Step 2


Step 3 – Blending. Now, I am ready to blend the iris. I take a small blending tortillion. After I blend, I do some minor touch-ups and blend again. I keep blending and touching up until I have the perfect iris.
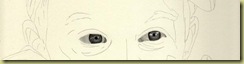


Eyes Step 3-4


Step 3-4


Step 4 – Whites of Eyes. The whites of our eyes are not pure white. Compare the whites of the eyes with the highlight on the iris. See? The highlight will be whiter. I either take a 2H pencil or a blender with a lot of graphite on it to create the white areas of the eye. The tear duct will be darker, so a pencil will need to be used for this. If you get the whites too dark, use the kneaded eraser to lighten the area.


**Tip** Sometimes you will notice that the outline drawing on your paper is not drawn accurately. This is where the clear acetate line drawing comes in handy. Place it on top of your drawing to find your place again.


**Tip** Another helpful tool is a value finder. Place one on your photo reference and another on your drawing. This will aid you in getting perfect values on your drawing.
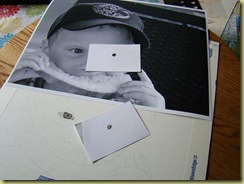
Value Finder


Step 5 – Eyelids. Now for the area around the eye. I darkened the eyelid line with a 2B pencil. Then, with a B pencil, I started in the shadows of the eyelid. Pay close attention where these darker values sit. Is it on the lid or on the brow bone? Keep the eyelid line dark. If it blends in too much, the eye will appear flat.


Taking the same small blender, I blended the eyelid.


Then, I moved to the bottom lid. Remember that our eyelids have thickness to them. Some refer that thickness on the bottom eyelid as an antwalk. Be sure to capture this thickness in your drawing even if your reference doesn’t show it.


After blending, I then moved to the skin area underneath the eye. You are saying “What? What about the eyelashes?” Be patient, they are coming…
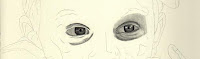


Step 5


Step 6 – Eyelashes. Now, for the long awaited eyelashes! Eyelashes are drawn in clumps, not in straight lines.


OOPS…before we go to the eyelashes. (I’m sorry.) I forgot to tell you that are eyelids cast a shadow on our eyes. So, a step or two back…Darken the upper part of the eye and blend.


NOW, the eyelashes! The top lashes are usually darker than the bottom lashes. I took a very sharp 4B pencil to create the lashes.


It is very important to have the skin tones around the eyes complete before putting in the eyelashes.
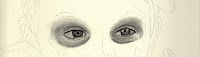

Step 6

He’s looking rather racoonish, eh?


Next time on The Drawing Board, the nose…

Wednesday, July 14, 2010

A Little Bit of Java – Wacky Wednesday

  007

aaah…smell…take a whiff of this…Smells delightful, doesn’t it? 

What does this coffee making experience have to do with art, you say?  WELL, let me tell you!  Without this little routine each morning, not much art would exist in my world.  It is part of my daily dose of inspiration. 

Now, coffee making is an art itself, but we won’t go there.  I can no way compare my coffee making skills to my local java house experts.  Those guys and gals are absolutely the best. 

I have seen paintings created with espresso by Karen Eland .  They are stunning.  I’ve often wondered how the acid in the coffee reacts to paper and canvas.  Is it considered archival?  Does anyone know?  Is it too new of a technique to know the results?

009 Coffee anyone?

Monday, July 12, 2010

Transferring Your Photo Reference

Last time on The Drawing Board, we talked about Choosing the Right Photo Reference.  Once I have chosen the perfect reference, I start the transferring process.

To transfer a photo reference to the drawing paper, I take a piece of Dura-Lar Clear Acetate Alternative.  I put the clear acetate over the photo reference.  Using a fine-tip Sharpie, I trace around the subject with great detail.

Detail is important when transferring the human figure.  Pay close attention to the eyes, nose, and mouth.  If these are not accurate, the whole drawing is off.  If you are a person with excellent perception skills, please do not trace!  Use the skills you have.  I don’t have good perception, so I trace.  I can hear you purists gasping right now!  What?!?!  You trace?  Yes, I trace.

TurnerThis little guy will be drawn to be 9” x 9”.  I am drawing him on Rising Drawing Bristol 3-ply plate board.  I have never used this before, so you’ll be the first to hear my reaction to it.

I have a lightbox I use to transfer my drawings.   If you don’t have a lightbox, a well-lit window will do fine.  First, I lay down my traced (gasp!) acetate outline drawing on the lightbox.  Be sure to secure the outline drawing so it doesn’t move.  Then, I tape my drawing paper on top.  Turn on the lightbox and the acetate outline should be easily seen through the drawing paper.  Using a 2H graphite pencil, draw the outline onto the drawing paper.  I use a 2H pencil because it has a harder lead that can easily be blended into the mid-tone values.  Be sure to press lightly.  A sharp 2H pencil will crease the paper if pressed too hard.  A creased paper will give you an impressed line that can’t be removed.

Next time on the drawing board is step-by-step eyes!